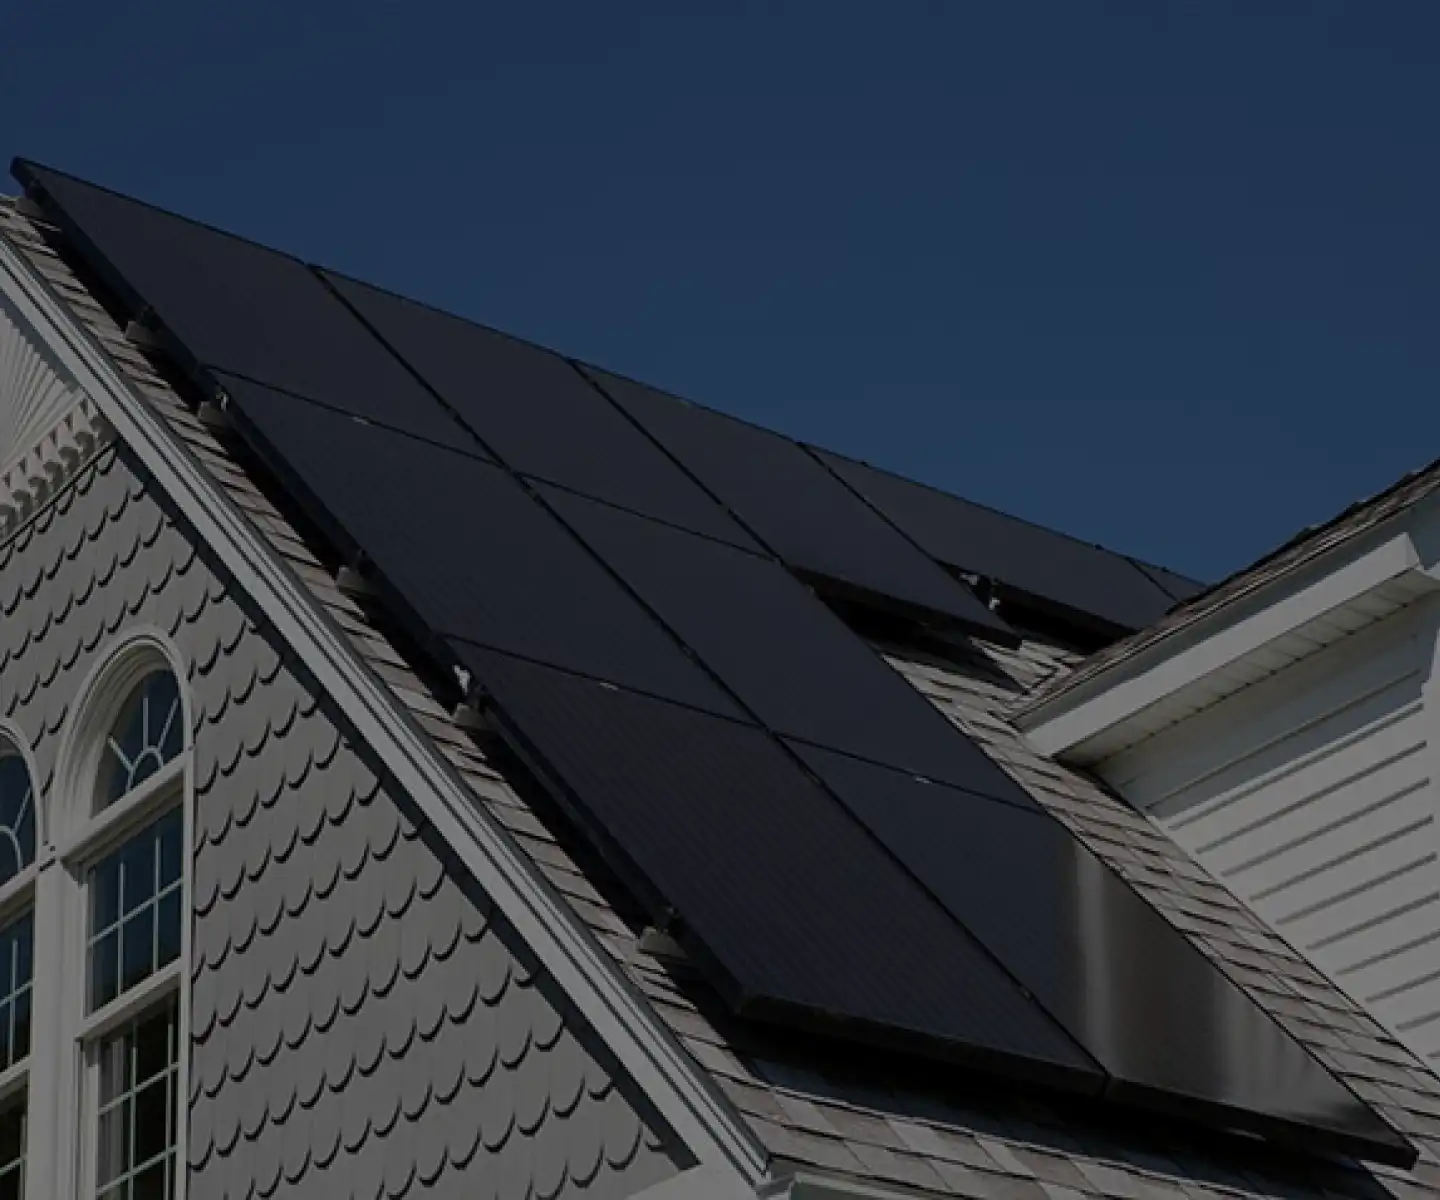
33 Tips for Installing Solar Panel Mounting Rails


Guest post by Big Living | Little Footprint
Installing solar panels yourself can seem a little daunting if you’ve never done it before or even if you have. Moreover, installing your solar panel mounting rails is truly the most physical portion of your DIY solar panel installation process. You will be laying out, measuring, aligning, drilling, making mistakes, probably re-drilling, and installing the majority of your solar panel system.
Yes, you will probably make a few mistakes trying to install your mounting rails and brackets. We know this because we are DIY-ers that did our entire installation and definitely made some mistakes and extra holes in our roof. It’s the nature of DIY projects. But don’t worry! We’ve learned from our experience and want to share some tips and lessons with you.
Now if you’re anything like us, you want all the tips and tricks you can find to be fully prepared for your project. So here are 33 tips on installing solar panel mounting rails to help your DIY solar panel installation go a little smoother. These tips are based on our experience with our products on our roof type, so it is always best to review your specific manufacturer's literature.
For our whole DIY solar panel journey and more tips, check out the Going Solar Series on Big Living | Little Footprint.
Tips For Setup
Tip 1: Have All the Tools You Need
- A Tape Measure
- A Chalk Line Snapper
- A Drill
- Drillbits
- An Impact Driver
- ⅜” Impact Drive Sockets
- ⅜” Impact Socket Adapter
- A Stud Finder
- Regular Chalk
- Roofing Pry Bar
- A Piece of metal wire / a Metal clothes Hanger
- A hammer or mallet
- Fish Tape
- Heat Gun OR Conduit Bender
- Multimeter
- Framing Square
Next, it’s time to lay out your array.
Tip 2: Read the Instructions
Listen carefully. It’s important to read the instructions. Go through your plan set and the supplementary instructions and make sure you understand the process. If you are confused by anything, reach out to GoGreenSolar for help or check Youtube for helpful videos. A lot of the manufacturers have videos showing the installation of their products that can help to clear up confusion.
Tip 3: Know the Weather Forecast
Before beginning this process you’ll want to make sure there isn’t going to be any rain in the forecast until you are done. We’ll be marking out the rails with chalk, marking rafter locations, and drilling holes for the mounting bosses. You don’t want the rain to wash away your chalk marks and you certainly don’t want it to rain after you’ve drilled holes but haven’t installed the attachments yet.
Tip 4: Steep Roof Means Invest in a Harness
If you have a steeper or slicker roof, your roof is high off the ground, or you don’t feel confident walking on the roof, then invest in a harness and be sure to use it. Also, always be sure to wear shoes with good traction and use knee pads if you are likely to have knee pain from kneeling on the shingles. If you have a metal roof, your normal shoes may be too slick to work safely. We recommend you get some specialty roofing shoes and work early in the morning or in cooler months so that the roof isn’t painfully hot.
Tip 5: Set Up Your Boundaries
Start by marking out the bounds of the solar panel array from your plans. The plans will provide you with measurements from your roofline and/or vent pipes that will help you to mark out the panel locations. Use your tape measure and chalk or the line snapper to mark out the rectangles that represent where your panels will end up. Then use the panel layout as a guide to mark the location of the rails. Pay attention to how the rails line up with your shingles and adjust their location slightly as needed.
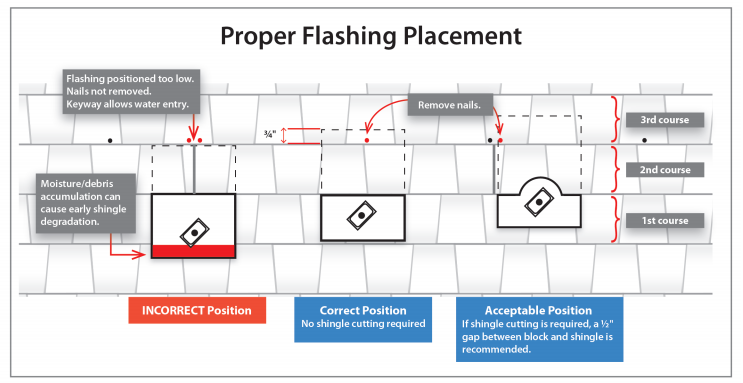
Tip 6: Rail Placement is Key
Place your rail a few inches from the edge of a row of shingles so that the flashing of the roof attachment penetrates up more than a full row of shingles and doesn’t overhang the row it’s on. If that sounds like gibberish, I don’t blame you. Just use the image below from the Quick Mount PV - QMSE - LAG - Data sheet as a helpful guide.
Be sure to check the installation instructions for your specific hardware, as there are a number of different roof attachments available.
Tip 7: You Will Miss, But It Can Be Fixed
If you are drilling into the rafters, you will miss occasionally and will have some extra holes in your roof. These are easy fixes. When you go to install your roof attachments, you will fill all of your holes with silicon (good and bad) and then cover them with a piece of flashing that will protect the holes. So any hole you make will be doubly sealed so long as it is close enough to the flashing that covers it.
Tip 8: Assess Your Rafter Patterns
If you have access to your attic, try to map out your rafter pattern. Measure a rafter’s location compared to a vent pipe and then measure their spacing pattern. Take note if this pattern changes anywhere and note that location. This is most likely at the corners of a hip roof or where a dormer or other feature may interrupt the roof's surface.
Tip 9: Mark Before You Drill
On your roof, mark the general location of each rafter using their spacing measurement. Then refer to your plans and circle which rafter’s get an attachment installed on them so you don’t end up drilling into one you don’t need to.
Tip 10: Complete a Single Rail First
Do a single rail first and then you can use a plumbob to find where that same rafter should cross the upper or lower rails.
Tips for Finding Studs
Tip 11: Place Cardstock Under Your Stud Finder
Place a sheet of cardstock, a manilla folder, or a piece of cardboard under your stud finder to make it easier to slide along the roof and get better measurements.
Tip 12: Use the Lowest Depth on Your Stud Finder
If your rafters had to be reinforced then it is likely that the sistered board is not going to be flush up against the plywood of your roof. This means that your stud finder might give you some weird readings.
If your stud finder is adjustable, try to take readings using the lowest depth possible to find your rafters. Then try to take note if your rafter has its sister board on the right or left side. Ideally, you will want to drill into the main rafter instead of the sistered board. If you feel your drill bit hit open air before plunging into the rafter, then you know you have a gap and you’ll want to shift over 1.5” to drill a new hole.
Tip 13: Tap to Find the Stud
You can use a rubber mallet to bang on the roof to try and hear and feel the location of the rafter in case your stud finder is proving to not be reliable.
Tip 14: Find the Stud with a Piece of Wire
After you’ve drilled a bad hole, stick a curved piece of thick wire or a coat hanger into the hole and spin it until you feel the location of the stud. Using that angle and knowing the length of the wire, you can know exactly where your stud is located and drill a new hole.
Tip 15: X Marks the Bad Hole
If you drill a bad hole, cross it off with chalk so you know it is bad and to help you find it and fill it later. Then draw a circle around the good hole just for good measure.
Tips For Installing Roof Attachments
Tip 16: Pre-fit All the Flashings
The caulking you’ll be using is very sticky and makes quite a mess if it drips or gets on your hands and tools. So you want to be able to do that process as quickly and smoothly as possible. To do that, you’ll need to go ahead and pre-fit all of our bosses. Simply slide the flashing in between courses of shingles to make sure it will fit.
Tip 17: Use a Pry Bar to Break Strong Adhesive
If the adhesive on your singles is particularly strong, use a hammer to carefully tap your pry bar under the top layer of shingles and break into the adhesive. Once the pry bar has broken into the adhesive, angle it 45 degrees and tap it sidewise to broaden the opening until it is wide enough for the mounting boss’s flashing to fit.
Tip 18: Take Your Time with the Shingles
Do not lift up on your pry bar or try to force it if you see the shingle start to rip. Instead, remove your pry bar and try coming at it from another location and walking your way over to your desired position. You don't want to tear up your shingles by being too aggressive. Take your time here.
Tip 19: First Row - Lift Over the Nail Head or Hammer It In More
You may hit the edge of a nail head for the first row of shingles. If you do, stick your roofing bar under the mounting boss’s flashing and lift it up over the edge of the nail head. You may need to hammer this nailhead down a bit more to help the flashing clear better.
Tip 20: Second Row - Cut the Flashing to Fit Around the Nail
If you hit a nail in the second row of shingles, you won’t be able to simply go over it and you will have to modify the flashing. To do this, use a pair of tin snips to cut a small triangle out of the top of the flashing. Use a file or sandpaper to remove any rough edges before sliding the flashing in between shingles.
Tip 21: Chalk Marks Make Aligning the Roof Attachments Easier
Once you have the flashing installed under the shingles, look through the hole and align it with the hole you drilled. This is where the chalk marks you made earlier come in handy so that you can be sure you are aligning it with the correct hole.
Once you have the boss positioned, continue down the line and then move on to the other rails.
Tip 22: Remove All the Roof Attachments and Caulk All At Once
If you pre-fit your flashings, I recommend removing them and doing all of your caulking at once. If you are going to caulk each attachment one at a time, then I recommend taking a plastic bag with you to stick over the end of the caulk between each flashing and to release the plunger after each use to prevent caulking from getting all over your roof.
Tip 23: Press Caulk Into Holes With a Finger on Your Non-Dominant Hand
After filling the bad holes, I liked to put a little extra at the top of the hole and then press it down with my finger to really smoosh it into the surrounding shingle material. This helps ensure there are no small gaps that water could seep through later on. After doing this, wipe your finger off or be sure to not touch anything with that finger. I used the middle finger of my left hand as I could then keep from using that finger for anything else until I was done.
Tip 24: Fully Caulk the Pilot Hole Per the Manufacturer’s Instructions
Be sure to fully fill the pilot hole with caulking before installing the lag bolt. If your manufacturer recommends doing so, you can also caulk an upside-down U on the underside of the flashing for extra protection.
Tip 25: Use the Pry Bar to Help Position the Flashing Over Nails
You may find it useful to stick your roofing pry bar in first and then slide the flashing along the top of the pry bar in order to keep it elevated as you position it. This ensures the flashing doesn’t get caught on any of the nail heads in the first row.
Tip 26: Don’t Over Torque the Lag Bolts
When installing your roof attachments, you’ll know that the lag screw is properly torqued down when the flashing can no longer rotate easily. Do not over-torque this assembly or you risk damaging your flashing, or roof/rafter. Over-tightened lag bolts will also cause your flashing to warp, which won’t be as effective at keeping water away from the penetrations.
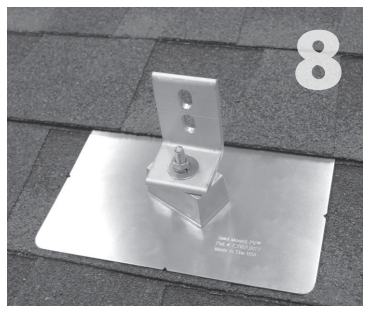
Tip 27: QBlock Should Be at an Angle
For Quick Mount QMSE flashings, lock the QBlock down at an angle so rainwater hits an angled surface as it comes down your roof instead of hitting a flat wall head-on. This will help prevent water, ice, and debris from backing up and possibly getting under your shingles. This is shown in step 8 of the instructions:
Tips for Installing Your Rails
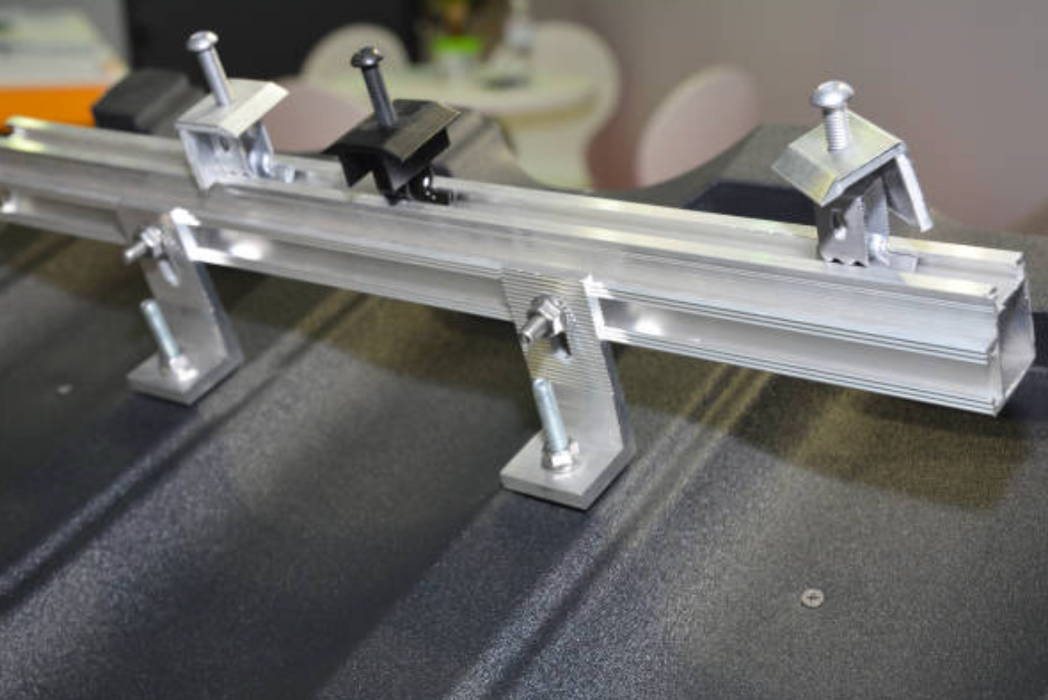
Tip 28: Rails Can Bend — Use a String to Ensure Alignment
As sturdy as the rail may seem, it can actually be flexed rather easily by a misaligned bracket. One of the quickest ways to ensure good results is to pull a string from one end of the rail to the other and make sure that your brackets are all in a straight line. If some of the brackets are off, shift them using the slot under the lag screw. Avoid loosening the lag screws as you don’t want to disturb your caulk by tapping on the L-brackets with a mallet to shift them into alignment. Repeat this with all of your rails to ensure they are all straight.
Tip 29: Use a String For Consistent Rail Height
You can also use a string to ensure that your rail is set at a constant height so that you don’t have any hills or valleys in the middle.
Tip 30: Use a String to Ensure Equal Heights for Multiple Rows
If you are going to be installing multiple rows of panels, run a string from the end of the bottom-most rail to the end of the top-most rail. Then adjust the height of the rails in the middle so they are just touching the string.
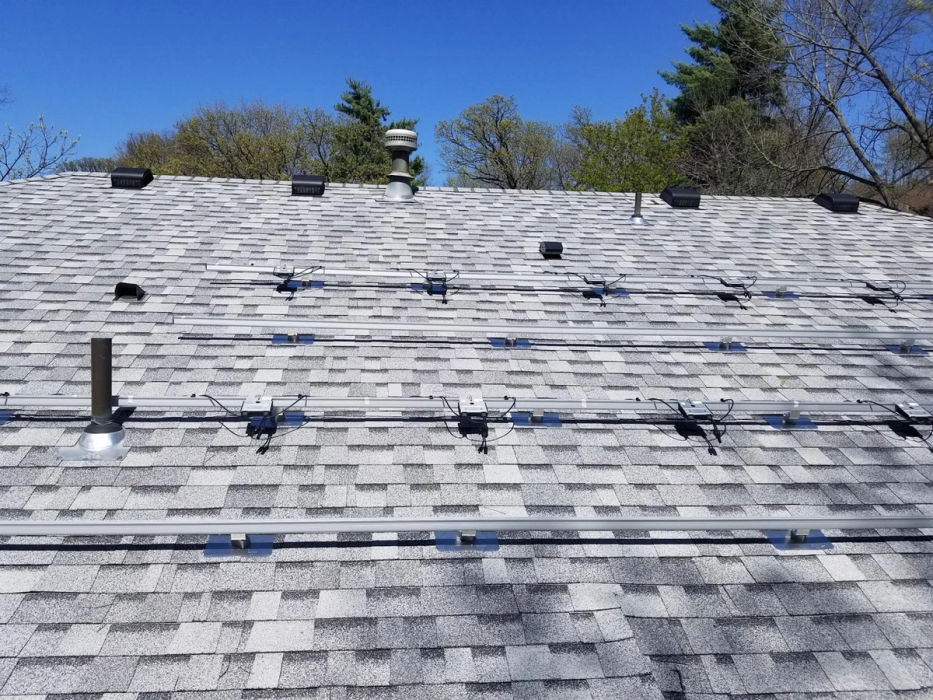
Tips For Installing your Optimizers or Microinverters
Tip 31: Don’t Forget to Peel Off the Optimizers’ QR Code Stickers
When installing your optimizers, don’t forget to go through and peel off the QR Code sticker on each optimizer and stick it onto your plans in their respective position. Once you send a picture of this sheet to GoGreenSolar, they’ll be able to layout your interface to show the panels in their actual position. This allows you to diagnose any problems later in case a panel isn't performing as it should. If you are using microinverters, the process will be similar to installing optimizers.
Tip 32: Make Sure to Secure and Bundle the Wires
Use the supplied clips to secure and bundle the wires so that none of them are drooping and touching the surface of the roof. If they are left loose, then they will slowly be worn down as they rub on the roof until they eventually cause a short.
Tip 33: Run Your Grounding Wire On the Rails Closest to the Junction Box
Don’t forget to run your grounding wire between each of the rails and secure it with your grounding lugs. I recommend running it at the end of the rails closest to the junction box since it will need to terminate in the junction box. Be sure to leave yourself some extra material to maneuver if needed.
In Conclusion
We hope you found our 33 tips for installing solar panel mounting rails useful! These were all things we learned during our DIY process that we wished we had known before to make our installation project easier.
Good luck with your DIY solar panel installation, and be sure to reach out to the folks at GoGreenSolar if you need more expert assistance.

About the authors: Amanda and Tyler Santoro are the creators of Big Living | Little Footprint, a site focused on helping people live a greener lifestyle. They are constantly doing DIY projects for their house like installing their own solar panels. They also focus on eco-parenting, making sustainable parenting choices and teaching their child to be eco-conscious. Their family strives to live big while still leaving a little footprint on their environment. You can follow along with them on their journey and all their tips for improving your green living lifestyle.