Design and Planning Tips for Your IronRidge Ground Mount Installation


IronRidge’s ground mount racking is a popular choice for residential and commercial projects, thanks to its ease of installation and design.
There are a few things you’ll need to consider when planning and designing your IronRidge ground mount installation:
- Tilt angle
- Pipe size
- Pipe specifications / type
- Foundation type
- Other considerations
Choose an Ideal Tilt Angle
Since the mount will be built at a fixed angle, it’s important to pick one that optimizes production and its ability to handle local conditions.
We typically recommend a tilt angle close to your latitude for optimal year-round production. For example, if you are at 30°N latitude, a tilt angle around 30° would be well suited for year-round production.
There are a couple of factors that might influence this:
- Lower tilt angles produce better in the summer months, which might be ideal if you have net metering and are sending power into the grid. This is why systems are commonly built at 25° tilt even at northern latitudes.
- Wind and snow conditions -- steeper tilt angles are better at shedding snow because it easily slides off, however lower tilt angles can better handle high winds because the array does not stick up as high and catch as much wind.
Select the Best Pipe Size: 2” vs 3”
IronRidge gives the option of using either 2” or 3” pipe which provides extra flexibility when designing your ground mount system.
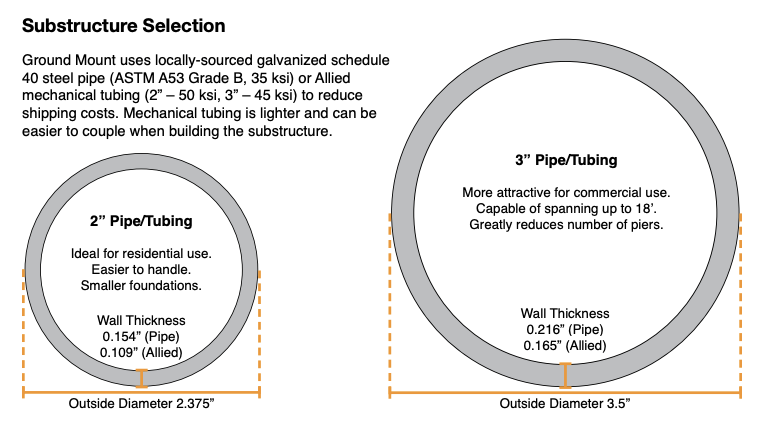
Here is what we generally recommend for pipe size:
- 2” Pipe:
- Ideal for smaller systems, usually less than 30-36 panels
- Easier to cut and handle
- 3” Pipe:
- Ideal for larger systems, usually larger than 36 panels
- Fewer piers with wider spacing
- Less pipe and concrete are required overall
In general, we see smaller projects and most DIY customers using 2” pipe, while larger installations benefit from the wider pier spacing with 3” pipe.
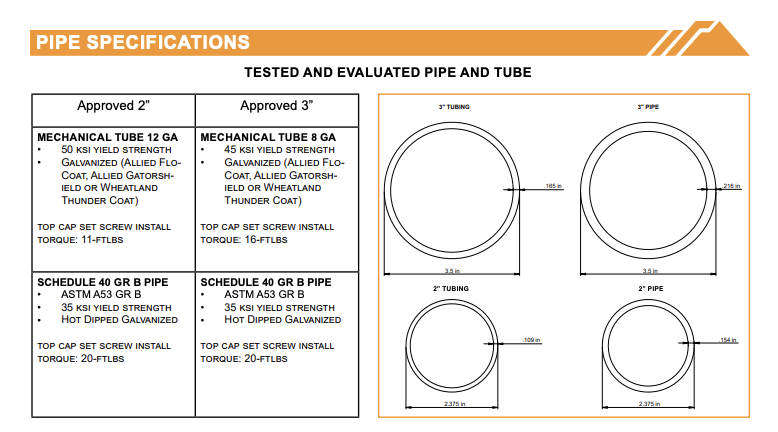
Consider Pipe Specifications and Type
There are two options when buying pipe for your IronRidge ground mount —steel pipe or mechanical tubing.
Mechanical tubing is made from higher-quality steel, and as a result, the walls of the tube are thinner, making it lighter and easier to work with.
You’ll need to choose a pipe or tube of the appropriate size, thickness and galvination. Be sure to refer to the latest IronRidge ground mount manual on their website.
We’ve included a snapshot from their current manual that shows acceptable types and sizes of pipe and tube:
Consider Foundation Type
IronRidge engineers their ground mounts to work with two standard foundation types — concrete footings and ground screws. There are also a few alternatives.
Concrete footings are the traditional choice. Installation simply involves digging holes and suspending the pipe while you pour concrete. This type of foundation is ideal for smaller projects and DIY installs:

You can adjust the diameter of the hole from 12” to 24”. Wider footings will not need to go as deep but may require more concrete overall.
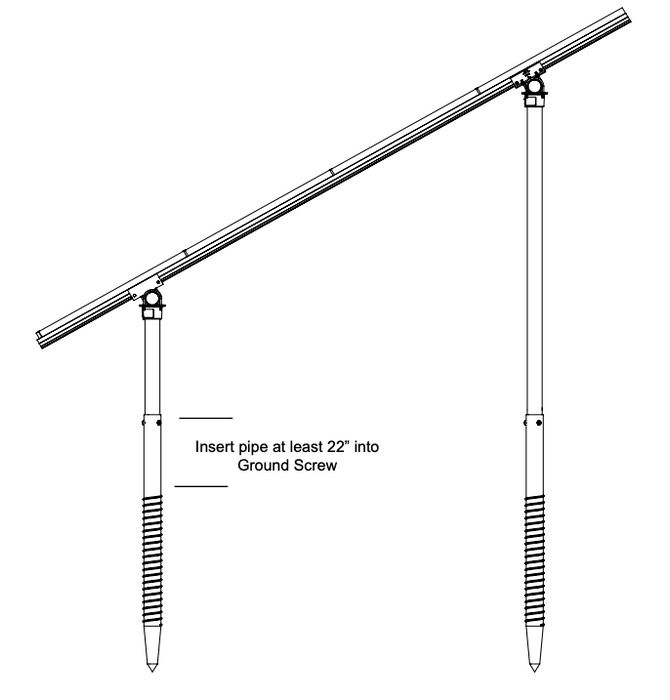
Ground screws are typically used for bigger projects because they require special equipment and on-site engineering. After the soil is evaluated by an engineer, a contractor uses a machine to drill in ground screws at the appropriate locations.
This is much faster for larger projects, but requires an initial investment in the engineering and equipment:
There are a few other options including helical piles, driven piers and ballasted footings.
Helical piles and driven piers will both require on-site engineering and specialized equipment, similar to ground screws.
Ballasted footings involve pouring a large concrete foundation above the ground. This is ideal for sites with bedrock or other factors that make drilling into the ground difficult or impossible. Ballasted footings need to be designed by a professional engineer, but do not necessarily require specialized equipment to install.
IronRidge has a short tech brief on the different types of foundations here.
Ask Yourself These Other Questions
There are a few other things to consider before your ground mount is fully configured.
Do You Need Diagonal Bracing?
Diagonal braces might be necessary or advisable depending on the project. As the name implies, these are installed diagonally between North-South piers to help brace and strengthen the ground mount structure.
Adding diagonal braces can help reduce the size of footings, and possibly reduce the overall number of piers/footings. Overall this can result in less pipe and concrete, which is traded off against the cost of the diagonal brace kits.

Which Rail Size Do I Need? XR100 vs. XR1000
There is also the choice between XR100 and heavier XR1000 rail. The XR1000 rail is required for taller configurations and anywhere there is heavy wind or snow loading.
Most of the ground mounts we sell use XR1000 but it’s good to keep rail choice in mind when trying to design the most cost-effective project where you might not need the heaviest rail.
What Does My Physical Layout Look Like?
Finally, you’ll need to consider the physical layout and how many rows and columns you want to install. IronRidge gives the option of 3, 4 or 5 rows high, scalable to nearly any number of columns. This is usually based on the available space and the size of the array, with bigger projects generally being taller.
Keep in mind that the tallest arrays with 5 columns high will require rails that are 17’ long. These can be difficult to deliver and transport due to the excessive length. But for bigger projects, it might make sense to increase the array height.
If the array is installed on a hill that slopes from east to west, you will likely end up breaking it into several smaller subarrays, to help maintain a lower pier height as the slope descends down.
Conclusion
We hope these tips are helpful for designing your IronRidge ground mount installation. Know that you can easily configure the IronRidge ground mount for a wide variety of applications and options.
Regardless of your design preferences and requirements, we are happy to help. Contact GoGreenSolar if you have questions or need a quote for your project.