
DIY Solar Panel Installation: Step by Step Guide
Did you know that you can save thousands of dollars in installation costs and cut years off your payback period by installing a solar energy system on your own?
If you're comfortable with climbing on your roof and capable of wiring a household electrical socket (or willing to learn), then you have what it takes to install your own solar system. With the help of just one other person, you can complete a DIY solar project over the span of 1-3 weekends. Also, you can hire an electrician or installer to help you with part or all of the project.
This DIY solar panel installation guide provides an overview of the requirements and steps necessary to successfully bring your solar project to fruition. From planning and permitting to interconnection and maintenance, we will walk you through every aspect of the installation process. With our expert tips and instructions, you can confidently install your own solar energy system and start enjoying the many benefits of renewable energy.
FAQs
So first, let's get started by answering the most frequently asked questions about DIY solar.
What Is a DIY Solar Panel?
As the name suggests, DIY solar panels are solar panel kits that you can assemble and install by yourself or with a bit of help. Think of DIY solar panels as the IKEA of solar power technology — they come with comprehensive, easy-to-follow, step-by-step installation instructions and our helpful customer support that leave no room for misinterpretation.
Is It Difficult to Install Solar Panels by Yourself?
While installing solar panels yourself may seem daunting at first, with the right knowledge and tools, it certainly is a manageable project. DIY solar requires some construction skills, knowledge of power tools, and a good understanding of home improvement and electrical safety.
So if you are capable of home renovation work, you should be able to quickly learn the ropes of DIY solar and install it yourself.
You can also do most of the work and only hire a professional for the parts you aren't sure about. For example, you can install all the panels on the roof and have a professional electrician make the final connections in your main service panel.
Learn more: How to Pick the Right Solar Installer
Is It Cheaper to Install Your Own Solar Panels?
A DIY solar installation will save you a significant amount of money. Your savings will depend on the size of your system, whether you install it by yourself, and if not, how much the installers in your area typically charge.
To give you a general idea, if you compare the cost of the equipment by itself to the cost of a turn-key installation, it's about $1.75 per watt. If you are looking at a typical size 6 kW residential system, that equates to a savings of around $10,500.
Learn more: The Cost of Installing Solar Panel Systems
How Long Does It Take to Install Solar by Yourself?
The time it takes to install solar panels yourself will depend on a variety of factors, including the size of your system and your level of experience. Generally, a DIY solar panel installation can take anywhere from a few days to a few weeks. It really depends on how much time you dedicate to the project.
But a good rule of thumb is to plan for about 2 hours of work per solar panel. So if you install a 16-panel system, it will take about 32 hours of work.

Pre-Install Steps
Before you roll on your sleeves and get to work, there are a few steps to go through to make sure you get the right equipment as well as the necessary permits.
-
Determine Your Energy Needs
Before you start the installation process, it is essential to calculate your energy needs. Consider the number of appliances, lights, and other electrical devices you plan to power with your solar system.
Use our step-by-step solar sizing guide to determine how many solar panels you would need.
-
Assess Your Property and Choose the Best Location
You need to assess your property to determine the best location to install your solar panels. Consider factors such as shading, orientation, and roof or ground space. Look for areas that receive maximum sunlight throughout the day, and ensure that there are no obstructions that may shade your solar panels.
-
Choose the Right DIY Solar Kit for Your Home
Now that you know your energy needs and found the best location to install the solar panels on your property, it’s time to choose a DIY solar kit that will meet your requirements. If you’re still unsure what’s right for you, connect with a solar expert and they’ll answer all your questions as well as point you in the right direction.
Read more: The 7 Best DIY Home Solar Kits
-
Buy or Lease
There are several financing options available for solar panel installations, including cash purchase, solar loan, and solar lease. Choose an option that works best for your budget and financial situation.
Learn more: Buy vs Lease Solar Comparison
-
Get the Necessary Permits
Since installing a solar system involves construction and electrical work you need to obtain a permit from the local authorities. In fact, you need several permits from:
- Authority Having Jurisdiction (AHJ) — Check if the municipality, county, or city has jurisdiction over your property and learn about their requirements.
- Homeowner’s Association (HOA) — If you live in a HOA community, you need their sign off as well.
- Utility Company — The UC will usually review your electrical wiring diagram and may require an inspection before allowing you to activate the system.
The application should include a site plan, system design schematics, an electrical wiring diagram, spec sheets and certification documents for components used in your system. It can take up to several weeks until your application is reviewed and approved.
If this sounds like too much work, we can do it for you. All our DIY solar kit customers can take advantage of our permitting services for a stress-free experience.
-
Have the Right Tools Handy
You’ll need more than a screwdriver to install your solar properly and securely. These are the essential tools for every DIY solar installation project:
- Hand tools and supplies
- Measuring tools
- Safety equipment
- Fall protection
- A sturdy ladder
- Power drill/driver
- Power saw
- Fully-charged battery or extension cord
- Flat pry bar
- Caulk gun
Learn more: Complete List of Recommended Tools & Their Uses
-
Buy the Necessary Materials That Don’t Come With the Kit
While most of the materials and equipment needed for a successful DIY solar installation come with the kit, some of them you’ll need to buy yourself.
For example, most DIY solar panel kits come with:
- Solar panels
- Inverters
- Monitoring system
- Racking System
While we at GoGreenSolar also include the racking and mounting equipment, keep in mind that many sellers don’t.
Moreover, electrical wiring is usually not included in the kits. Wire, conduit, fittings, breakers, AC/DC Disconnects (if required), junction boxes and a sub panel (if required) can be purchased at any electrical supply shop, Home Depot or Lowes.
Once your plans are finalized, we will provide you with a shopping list that includes all the necessary components.
-
Get Safety Equipment
Working on a DIY solar installation means dealing with electricity, climbing on roofs or other elevated surfaces, and handling heavy and potentially dangerous equipment. As such, it's important to have the appropriate safety equipment to protect yourself and prevent accidents.
Here are some examples of safety equipment that you may need:
- Safety glasses: You may need to drill holes or handle glass components that could shatter and cause eye injuries. Safety glasses can help protect your eyes from flying debris.
- Work gloves: They can help protect your hands from cuts, scrapes, and other injuries.
- Hard hat: If you're working on a roof or other elevated surface, a hard hat can protect your head from falling objects.
- Harness and lanyard: If you're working on a roof or other elevated surface, a harness and lanyard can prevent falls and keep you safely secured.
- Safety shoes: Once again, when working on a roof or other elevated surfaces, it's important to wear shoes with slip-resistant soles to prevent slips and falls.
- Ladder: A ladder can help you safely reach and work on elevated surfaces.
- Fire extinguisher: Solar panels and other electrical components can pose a fire risk if they're not installed or handled properly. Having a fire extinguisher on hand can help you quickly put off any fires that may occur.
Overall, the specific safety equipment you'll need for your DIY solar installation project will depend on the size and complexity of your system, as well as the specific hazards present in your work environment. Be sure to thoroughly assess the risks and take appropriate safety measures before starting any DIY solar installation project.

Installation Process
Now that you have obtained your permits, have the DIY solar kit and all the necessary tools and safety equipment, it’s time for the heavy lifting.
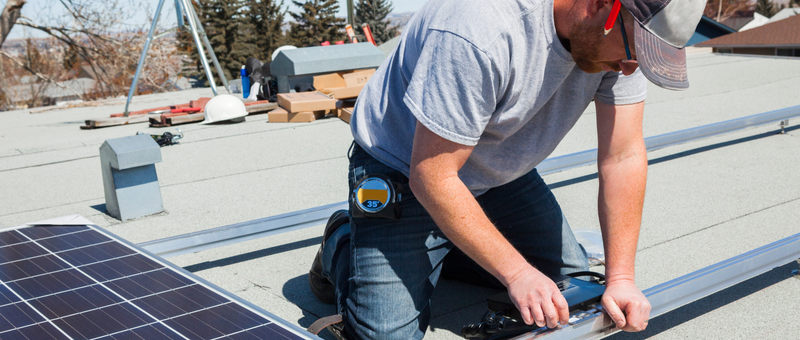
1. Install the Racking System
Roof Mounted

For roof-mount kits, the first step is to mark the location of your roof rafters. These support beams will act as the foundation for your solar array. If your rafters aren’t visible from the outside, you can buy a stud finder or measure their location from the inside of your attic. Locate your rafters and mark them with a chalk line to visualize the layout for your racking rails.
After measuring everything, bolt the flashings to the rafters at the marked locations. A flashing is a thin sheet of material that prevents leaks and provides an attachment point to mount your racking rails.
Once the flashings are set, bolt the racking rails to the flashings.
Learn more: 33 Tips For Installing Mounting Rails and How to Install Solar Panels on a Tile Roof
Ground Mounted

Ground mounts are a bit different from roof mounts. Because there are no roof rafters supporting the weight of the solar panels, you’ll need to build a standalone metal foundation to support the array.
Before building the support structure, dig holes at least 18” deep and pour concrete footings to anchor the structure to the ground. Once the base poles have been placed in concrete, wait at least a week to allow it to fully dry and set.
Ground mounts also require your wiring to be buried underground to comply with the National Electrical Code (NEC). It’s wise to rent machinery that can dig trenches and anchor holes to speed up this process.
Once the metal substructure is built, the rest of the process is the same as with roof mounts. You’ll secure your racking rails to the support structure, which provides a foundation for your panels.
Read more: Design and Planning Tips for Your IronRidge Ground Mount Installation
2. Inverter Installation
If your system uses microinverters, these small units will need to be screwed onto the back frame of your solar panels before installing the panels on your mount. Make sure the units are wired first, as the connection points won’t be accessible once the panels are mounted in place.
String inverters should be wall-mounted in an easily accessible location, like the side of your house, or the back of a ground mount structure. Inverters should be mounted as close to your solar panels as possible for a more efficient and cost-effective wiring run.
Read more: 8 Tips on How to Install a Solar Inverter and What’s the Best Location for It
3. Solar Panel Installation Process
Once the racking has been built, installing solar panels is fairly straightforward by comparison.
- Use two end clamps to install the first panel on the rails.
- Then, use grounding mid clamps for each consecutive panel – mid clamps bound the solar panels and rails together, into one continuous system.
- Finally, complete the row with two more end clamps to secure the last panel on the rails.
If you are installing panels on your roof, be sure to hook up the connecting wires before bolting the panel to the racking rail, as the connections will be inaccessible once the panel is installed in place.
Learn more: The Best Angle to Install Solar Panels
4. Install the Battery
In case you’ve purchased a solar panel kit with battery backup, this is the point to install and set it up. The battery installation process will vary depending on the battery type and manufacturer, but here’s a general overview of how it goes:
- Site preparation: Identify the installation location and ensure it meets the requirements for space, ventilation, and access. Also, prepare the installation surface to support the weight of the battery and install the mounting bracket.
- Electrical installation: Install the AC and DC wiring, and the current transformers (CTs) as per the manual instructions. Ensure that the AC and DC circuits are properly grounded and connect the battery to the gateway for commissioning. Moreover, depending on the type of the system, some batteries can also be connected to the inverter. Check if this applies to you.
- Mechanical installation: Mount the battery onto the prepared surface using the mounting brackets and secure it in place.
- Commissioning: Configure the battery, verify that it is communicating with the monitoring system, and confirm that the system is operating as intended.
We highly recommend to consult the manufacturer’s installation manual and follow all the instructions and safety precautions during the installation process.
5. Wiring the System
Once the panels have been secured to the mount, the final installation step is to wire the system components together according to your planset. The wires from your inverter(s) will be routed through a junction box and a PV disconnect switch, before finally terminating at your home’s circuit breaker box that connects your system to the grid.
Learn more: Solar Panel Wiring Basics: Series vs. Parallel

Post-Install Steps
Congratulations! Your solar system is officially installed so now it’s time to turn it on. But to do so, there are only a few steps left.
-
Schedule and Pass the Solar Inspection
After completing a solar installation, a solar inspection is required to ensure that your solar system is safe and compliant with local regulations. Here's how to schedule a solar inspection:
- Contact your local building department: They will provide you with information on what inspections are required and how to schedule them.
- Schedule an appointment: Once you have all the necessary information, contact your local building department to schedule an appointment for the inspection.
- Prepare for the inspection: Before the inspection, make sure your solar system is easily accessible and that any necessary equipment, such as ladders or tools, is available.
- Attend the inspection: On the day of the inspection, make sure someone is available to grant the inspector access to your solar system. Usually, the city gives you a 4-hour window of when the inspector will arrive, so you will have to wait.
Once the inspection is complete, the inspector will provide you with a report detailing any issues or concerns they may have found. If there are any issues, you may need to make repairs or modifications to your solar system before it can be approved.
Learn more: What Happens During a Solar Panel Inspection and How to Pass
-
Complete the Interconnection
You’ve already filed your interconnection application and got the permit from your utility company in the pre-install phase. Now that the solar system is installed, it’s time to obtain permission to operate (PTO). If you’re a GoGreenSolar customer, we will require the signed inspector record (from the previous step) so we can send it to the utility company.
90% of our projects don't require an onsite utility inspection. Most utility companies accept the local building department's inspection record that the system has been installed to code. However, there’s still a small chance for a final inspection to ensure that your system is safely and properly installed.
-
Set Up Monitoring
To ensure the optimal functioning of your solar, setting up a monitoring system is a must. This will help you detect any issues and ensure that your system is operating efficiently.
Presuming you’ve already installed the monitoring equipment that came with the solar kit, it’s time to get it up and running:
- Connect to the internet: Many monitoring systems require an internet connection to transmit data to the monitoring platform. Make sure you have a reliable internet connection available and connect your monitoring equipment to your home network.
- Register your system: After your monitoring equipment is installed and connected to the internet, you will need to register your system with the monitoring provider. This may involve providing information about your solar energy system, such as the size and type of panels and the inverter rating.
- Set up alerts and notifications: Many monitoring systems offer alerts and notifications that can inform you of any issues with your solar energy system, such as a drop in energy production or a malfunctioning component. Set up alerts and notifications to ensure that you are promptly informed of any problems.
- Monitor your system: Once your monitoring system is set up, regularly check to ensure that it is producing the expected amount of energy and that there are no issues. Use the monitoring data to identify areas where you can improve the performance.
-
Perform Regular Maintenance
Solar panels require very little maintenance, but it is important to keep them clean and free from debris to ensure maximum efficiency. Here’s a quick checklist to run through evey once in a while:
- Check for debris: Regularly check your solar panels for any debris, such as leaves or bird droppings, that may be blocking sunlight and reducing energy production. Clean your panels as necessary using a soft brush and mild soap.
- Check for damage: Inspect your solar panels and other components, such as wiring and mounting hardware, for any damage or wear and tear. Replace any damaged or worn components as necessary.
- Check the inverter: The inverter is a critical component of a solar energy system, as it converts the DC power generated by the solar panels into AC power that can be used in your home. Regularly check the inverter to ensure that it is functioning properly and generating the expected amount of power.
- Check battery systems: If you have a battery backup system, regularly check the batteries for proper operation and charge level. Replace any batteries that are not functioning properly.
- Check your monitoring system: Believe or not, many people stop checking their monitoring on a regular basis, and thus miss system errors that might affect the data.
Solar Calculator
Which Solar Kit Do I Need?
GET STARTED WITH SOLAR
WE’LL HELP YOU FIGURE OUT YOUR SOLAR NEEDS!
Fill out the form for a complimentary solar quote that includes a custom satellite layout, system design and a breakdown of total project cost and estimated savings.